Coffee or Tea? Mac vs. PC? iPhone OS or Android? Eclipse or IntelliJ IDEA (or NetBeans)? Believe it or not, software developers argue as much about their IDE as any of these other hotly-debated topics. And for a good reason—not all IDEs are created equal.
Moving from Eclipse to IntelliJ can be quite overwhelming. Many Java developers lack the patience to learn a new IDE with its own set of shortcuts. And in some cases, the switch from Eclipse to IntelliJ IDEA requires changing your mindset about what your IDE can do.
The purpose of this blog is to show Eclipse users how quick and easy it is for Java developers to get started with Eclipse IDEA. Read on to learn:
Back to top
What IDEs are Java Developers Using in 2024?

Source: 2024 Java Developer Productivity Report
IntelliJ IDEA is the environment of choice for Java developers, and for good reason: IntelliJ is a feature-rich, enterprise-ready Java IDE. According to the 2024 Java Developer Productivity Report, 41% of respondents use IntelliJ IDEA as their primary IDE. Eclipse held onto the second position at 23%. Additionally, 84% of respondents using IntelliJ IDEA said they use more than one IDE in their Java development practice, with VSCode being the most popular secondary IDE.
📚 Want to learn more about Java IDEs? Check out this guide.
What Makes IntelliJ IDEA Different?
IntelliJ is set apart as the only Java IDE with a paid version. A number of features are only available in the commercial distribution of IntelliJ IDEA. The community edition is enough for Java and even for Android development, but you will miss a lot of cool features. This blog assumes that you will be evaluating IntelliJ IDEA Ultimate Edition.
Back to topGetting Started With Your First Project in IntelliJ IDEA
Let’s start the guide with getting your first project set up. Instead of creating a new project, you most likely will need to import an existing project.
🧑🎓 Already a JRebel user? Watch this online course on how to install JRebel in IntelliJ.
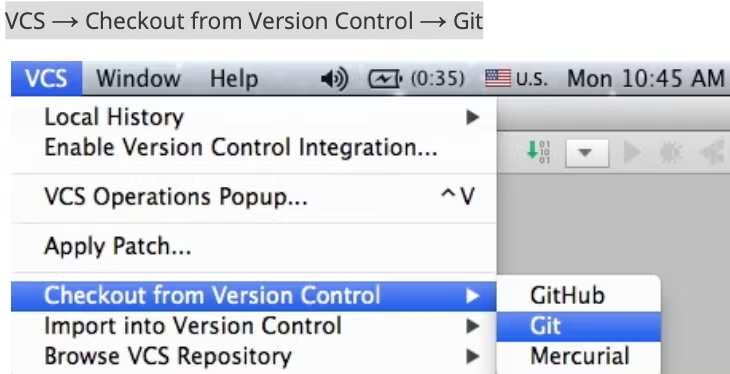
Cloning and Importing the Project From a Git Repository
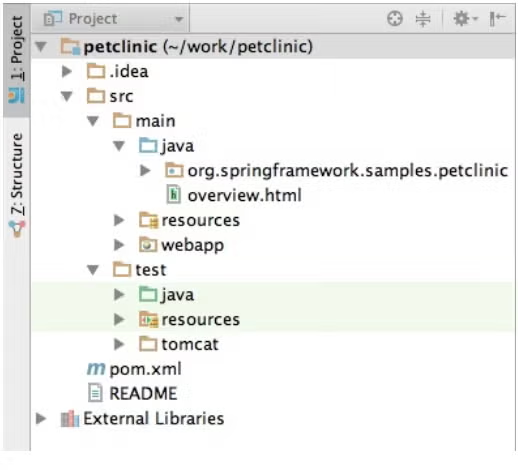
For this example, we'll use a Petclinic web application based on the Spring framework.
VCS → Checkout from Version Control → Git
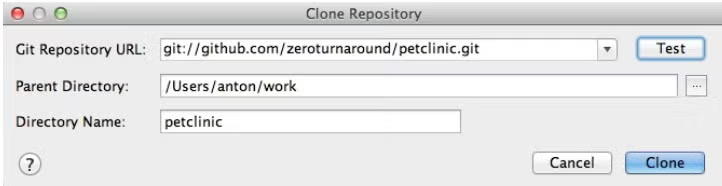
2. In the dialog, enter the repository URL and the destination folder. Click Clone to import the project.
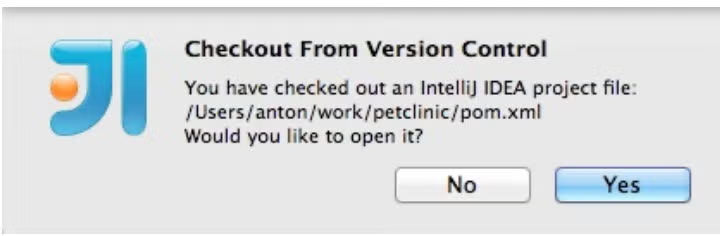
3. Once the project sources are cloned, the IDE will ask if you want to open the project because it discovered Maven’s pom.xml. In addition to Maven, IDEA also detects Gradle and Eclipse configuration files.
If you had another project opened, the IDE will ask if you want to open it in a separate window.
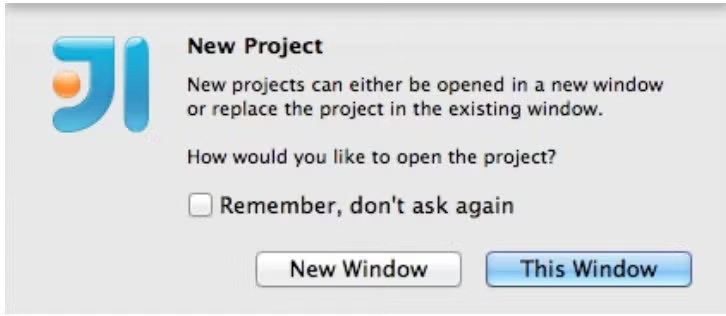
As an Eclipse user, you might be confused here—why would you need to open a project in another IDE window? This is not how the things work in Eclipse. With IntelliJ IDEA, you can have an IDE window per project.
Back to topA project in IntelliJ is the same as a workspace in Eclipse.
A module in IntelliJ is the same as a project in Eclipse.
Project Structure and Configuration in IntelliJ
Project structure and configuration in IntelliJ IDEA is very different from Eclipse. Almost everything—from project structure, folder management, how the packages are represented in the project tree, and this terminology issue with projects vs. modules looks really weird to an experienced Eclipse user.
Folders in IntelliJ
Every project module can include a number of folders that can be handled differently. When importing the project from a model (e.g. in the case of a Maven project) IDEA automatically discovers the source, test and resources folders. You can also set the folder type manually by selecting the appropriate option via the Mark Directory As context menu by right-clicking on the folder in project view. All dependencies for the module can be found under External Libraries.
The project view can be adjusted according to your preferences.
For instance, the way the packages are displayed, or if you would like to autoscroll to the source when selecting a resource in the project view, etc.To get the detailed overview of all the modules, libraries and other settings related to the project, open the Project Structure dialog Ctrl+Shift+Alt+S / Cmd+;
The modules view in the Project Structure dialog provides a full overview of the folder types in the selected module. Note that the Java language level can also be configured per module. For defining the compilation target folder there are two options: either put every module’s compiled classes to the same location, or use a module- specific location, which can be overridden.
Dependencies can be specified in a variety of ways. For a Maven project, IDEA just automatically imports the dependencies specified in pom.xml and stores the list in an *.iml file in the root of the module. Alternatively, it is possible to save the list in Eclipse-specific format.
Facets in IntelliJ
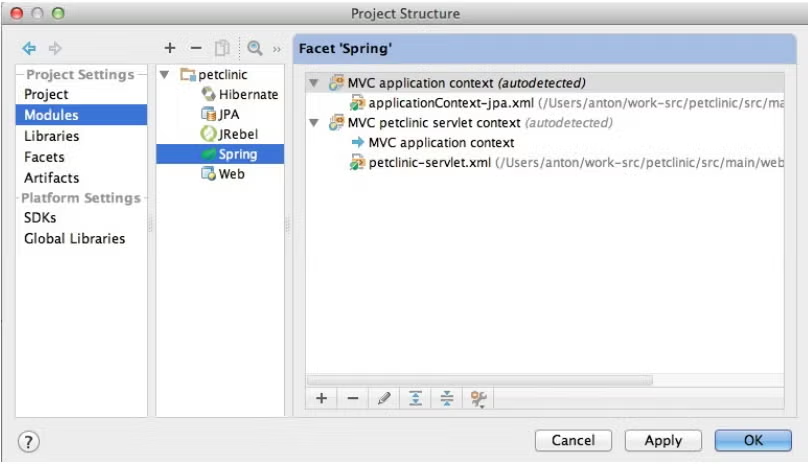
Once the project is opened and after the initial scanning, IDEA will tell you that it has detected some artifacts and will suggest that you set some facets for the module, which are like little configuration assistants.

Clicking the Configure link in the popup will create a dialogue box with a suggested list of configurations (e.g., Hibernate, Spring, JPA, etc.).
Facets are used to streamline the project configuration in IDEA, and they encapsulate the support for a variety of frameworks, technologies and languages. For instance, a tool, e.g., JRebel, can be set up to add its own facet to configure specific properties for a module. Now you can configure web-specific properties for the module.
Facets also exist in Eclipse, but this configuration method isn't widely adopted. In contrast, IntelliJ users depend on facets as a common way to configure modules.
Modules vs. Projects in IntelliJ
In Eclipse, you would usually put a lot of different projects into the same workspace and then filter them with Working Sets or by closing the projects that aren’t relevant at the moment. Workspaces are rarely used for grouping arbitrary projects; rather, they're used as a common root and the projects are added to or removed from the workspace. The average Eclipse user would have a limited number of workspaces in the file system.
In contrast, IntelliJ's project is an umbrella for logically connected modules. The modules are similar to Eclipse projects with the only difference that IDEA modules can be nested within the project tree.
Normally, you wouldn’t put the disconnected modules under the same project. You would rather open a new IDE window with the second project than importing another non-related module into the existing project.
Back to topKeymap, Navigation, and Settings in IntelliJ
Looking to become more efficient at using IntelliJ? Here are some handy guides that compare keybindings, settings and more in Eclipse vs. IntelliJ.
🔎 Looking for shortcuts? Download this IntelliJ IDEA keyboard shortcut cheat sheet.
Keymap in IntelliJ
Key bindings is something that gets welded into the backbone of developers—this is probably one of the hardest parts about migrating to one IDE from another. The most painful thing is when you hit a shortcut that performs a completely different (and often harmful) action than what you expect. If you are Eclipse user, try hitting Ctrl+D / Cmd+D in IntelliJ IDEA: you will realize the issue immediately!
You can change the bindings of your keymap in IDEA. Press Ctrl+` and select a preferred keymap. Key binding choices include Eclipse, NetBeans, Emacs, and more. The best strategy is to stick with the default key bindings and only change those handful of shortcuts that are really welded into your muscle memory and you can’t help yourself but hitting the wrong keys.
Navigation in IntelliJ
If you’re a new user and just starting to learn IntelliJ, you would probably want to switch on the toolbar as well as the tool window buttons. However, these control elements take up some space from the working area and as you learn the navigation shortcuts, you will most likely hide these elements after a while.
One of the most popular navigation features in IntelliJ IDEA is the ability to navigate to a particular class, invoked with Ctrl+N / Cmd+N. Similarly, the Navigate to File action is accessible with Ctrl+Shift+N / Cmd+Shift+N. This action can actually be used to navigate to a folder in the project tree by adding a slash to the end of the search pattern. Next, you can also Navigate to Symbol, Ctrl+Shift+Alt+N / Cmd+Shift+Alt+N, to navigate to a specific class, method or a field.
Arrows can be used for navigation between tabs, but also for navigating the cursor position history.
Ctrl+→ and Ctrl+← allows you to navigate between tabs as they are opened in the editor. That’s a pretty basic navigation feature. However, IDEA maintains the history of the cursor positions within the files as we have been browsing through the code. So it is possible to get back to the position in the code even if we don’t remember which exact file it was. Use Ctrl+Alt+→ and Ctrl+Alt+← for navigating over the cursor positions history.
Code Formatting in IntelliJ
Code style is very important when working in teams. If your team members are using different IDEs, there might be some issues. Even if the team members try to adjust the settings as much as possible to match each other, still chances are high that something will be different in the way the different IDEs format code. To reformat the code, press Ctrl+Alt+L / Cmd+Alt+L and the appropriate dialog will appear.
IntelliJ IDEA is capable of importing code formatter settings from Eclipse without the use of any plugins. All you need to do is export settings from Eclipse: go to Eclipse’s Preferences → Java → Code Style→ Formatter and export the settings to an XML file via the Export All button. Then open IntelliJ IDEA Settings → Code Style → Java, click Manage, and import that XML file by simply clicking Import.
Back to topTesting, Deployment, and Artifacts in IntelliJ
Ready to dive into testing and deployment in IntelliJ? Read on to learn about the similarities and differences of running unit tests, making deployments to application servers, and more in IntelliJ vs. Eclipse.
Running Unit Tests in IntelliJ
Executing unit tests in IDEA isn’t very different from how you would do it in Eclipse. Right-click on a module, from the context menu select Run ‘All Tests’. IntelliJ IDEA will execute all the tests that are located under the test folders.
In the same way it is possible to select a single package, or a few test classes from different packages. This is especially handy when you would only like to run a limited set of tests locally.
The Test kind combo-box allows you to specify what kind of test execution we would like to define for the particular configuration. The ‘Pattern’ value for the type of test would allow to specify an expression to match the names of test classes for execution. No need to specify exact names of the classes— just write a regular expression. Of course, there are all the other Test kind options available for running the tests for a particular package, test class, or just a single method in a test class. Test results are observed in the Run tool window.
Deployment to Application Server in IntelliJ
IntelliJ IDEA has the concept of Run Configurations, just like with Eclipse. Before you can run an application, you need to create a run configuration for it. Open the Run Configurations dialog via Run → Edit Configurations.
For every application server you can either create a Local configuration, or Remote. The Local configuration can be used if you intend to start the application server from the IDE. The Remote configuration type is good when the application server is started externally, either on the same machine or remotely.
Once a configuration is created, the dialogue will notify you that the deployment artifact is missing; notice the Fix button in the bottom right. By pressing the Fix button, IDEA will automatically derive what kind of artifacts are possible to create and deploy from the project structure.
Once the deployment is configured, you will see the Application Server view in the main IDE window. It lists the servers and the artifacts that should be deployed. Now you can just hit Shift+F10 to start the currently selected Run Configuration.
Artifacts in IntelliJ
When you compile your module, the compilation results are placed into the module output folder. As a result, you get the ability to run, test and debug your application. However, as soon as you want something additional, you have to define an artifact.
An artifact may be as simple as your module compilation results packed in a .jar, and it may also include compilation results from more than one module (in different formats like .war, .ear, etc.).
For the “happy-path” scenario, as in our case with the Petclinic application, artifacts can be created semi-automatically; you just push the Fix button while creating the Run Configuration. This is because the sample application makes use of Maven and IDEA integrates well with that.
However, in case of more complicated scenarios, such as when the artifact structure doesn’t match the project structure, then you have the ability to define exactly what should be the final result of the make process.
📝 Not sold on converting to IntelliJ? Here's a handy keyboard shortcut for Eclise.
Back to topEliminate Redeploys in Any Java IDE
Whether you're a diehard Eclipse user, a new convert to IntelliJ IDEA, or dabbling in using more than one Java IDE with the likes of VSCode, JRebel can integrate directly with your IDE. Discover how much time you could save by eliminating redeploys and visualizing code changes while mantaining application state. See for yourself during your 14-day free trial.